![[object Object]](/_astro/aglaia-dark.fX8O5LwM.png)
Quickstart
Aglaïa is a desktop app that turns book photos (or a PDF) into a searchable
PDF / Markdown. Everything happens in the app — no command line. Each book
you work on is a project, saved as a single <name>.agl file you can
move, back up, or reopen later.
Install from aglaia.bibli.cc: the .dmg on macOS
(Apple Silicon — open it and drag the app to Applications), the installer on
Windows, the AppImage on Linux (chmod +x, then run).
There’s also a cross-platform command-line mode for power users (
aglaia runfor batch processing,aglaia serverfor an HTTP job API) — see the CLI reference. This guide stays in the app.
1. Open the app — the starting window
When Aglaïa launches you land on the starting window, a gallery of cards:
- Recent projects — one card per book you’ve opened recently (with a thumbnail and scan count). Click one to reopen it. The small × forgets a card without deleting the file.
- New project — the accented last card. Click it to set up a new book.
Creating a new project asks for a few choices:
- Name & folder — what to call the book and where to save its
.agl. - How pages come in — two cards:
- Capture — you’ll photograph pages with a camera.
- Files — you’ll import photos or a PDF you already have.
- Pipeline — the cleanup recipe (e.g. curved book, 2 pages per photo). The default is right for most books; Properties opens the full editor if you want to tweak it. You can also change it later.
Pick, confirm, and Aglaïa opens the main window for that project.
2. The main window
The window has two parts: the work area on the left (the live camera and/or the column of scanned pages, each showing raw → cleanup stages → result) and the sidebar on the right — a vertical strip of icons, each opening one panel. Top to bottom:
📷 Capture
Photograph pages with a built-in or Continuity (iPhone) camera. Pick the camera, frame a flat page, and shoot with the button (or say “photo” with voice control). Every shot is processed live and added to the scans column. The DPI readout here is critical — see Troubleshooting.
⬇️ Import
Drop in photos or a PDF (it extracts or renders each page). Use this for scans you already have instead of a live camera.
🎚️ Pipeline
The cleanup recipe applied to every page (deskew → detect pages → flatten → black-and-white). Switch recipes, tune steps, or preview the effect. This panel also has a Fix input DPI button — the single most important fix when results look wrong (again, see Troubleshooting).
🔤 OCR
Add a searchable text layer. Pick an engine (Apple Vision on macOS, a local VLM, or the Mistral cloud) and the language(s), then run it. Without OCR your export is an image-only PDF you can’t search.
A cloud batch run is cheaper and answers later: leave it, come back, and press Check result. Aglaïa then keeps the engine’s raw answer inside the project, so the text can be rebuilt without paying for the OCR twice.
📤 Export
Produce the final file(s):
- a searchable PDF — the page image plus an invisible, selectable text layer,
- Markdown — the text as a clean document,
- an OCR textpack — all of that in one archive, with the OCR’s provenance, for a library that wants the evidence too, and/or
- a destination — an installed plugin that sends the finished export somewhere (a Kindle, a Calibre library, a folder, a corpus).
Exports land next to your .agl project file. A send goes straight to the
plugin instead, so it asks for no filename.
If the text layer cannot be written, the PDF export fails and writes nothing, naming the pages at fault. A file that looks searchable and is not costs more than a missing one.
🔌 Plugins
Browse the plugin store and install what your work needs: a processing step, an OCR engine, or an export destination. Nothing ships inside the app, so this list starts empty.
Bottom of the sidebar: close the project, report a bug, and settings (theme, language, default OCR engine, capture shortcuts, …).
Troubleshooting
Bad output? It’s almost always the DPI.
Read this first, every time. If letters look broken or merged, the black & white is smeared, or a flattened page is over-curled — stop and check the DPI before changing anything else. Wrong DPI is by far the most common cause of bad results, and no amount of pipeline tweaking will fix it.
What DPI is. Dots (pixels) per inch — how many pixels cover one inch of the real page. It’s how Aglaïa knows the true size of the text, so it can size its cleanup correctly.
Why it matters so much. The black-and-white conversion, speckle removal, page-flattening and deskew all measure in millimetres and scale by DPI. Tell the app 300 DPI when the photo is really ~110 and every one of those is ~3× off — strokes break up, thin lines vanish, noise survives. The picture looks fine to your eye; the math is wrong.
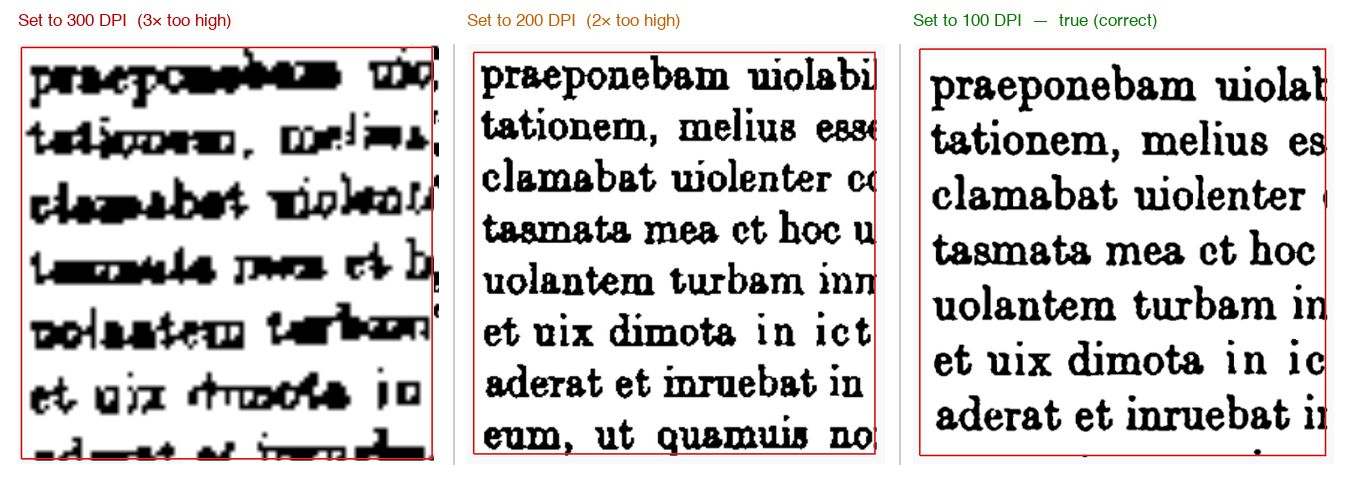
Set it in the app.
- While capturing: click the DPI readout in the Capture panel to type a value, or use Calibrate DPI — hold a credit-card-sized card flat in frame and the app measures the scale for you.
- After importing: Pipeline panel → Fix input DPI. It lists every page; set the DPI on one row, or tick several checkboxes and set them all at once, then Set DPI and reprocess.
Photos with no DPI info (most phone pictures) — estimate it:
- From the page size — page
mmwide, imageWpixels wide: DPI = W × 25.4 / mm. (A5 ≈ 148 mm, A4 ≈ 210 mm, Letter ≈ 216 mm.) Example: a 1700-px-wide photo of an A5 page →1700 × 25.4 / 148 ≈ 290. - From the letter size — measure how many pixels tall a lowercase letter
is (its “x-height”). A typical book is set in ~11 pt type, whose
x-height is about half that: DPI ≈ x-height-in-pixels × 13.
Example: lowercase letters ~8 px tall →
8 × 13 ≈ 104. Use 11 pt unless the print is clearly larger or smaller.
Getting within ~15 % is plenty — Aglaïa is tolerant, just not to a 3× error. When in doubt, it’s the DPI.
Other fixes
- A single page came out wrong → tune that page by hand: switch off a cleanup step for it, drag its crop or its page corners, set the rotation, move the dewarp sliders (see the GUI guide). Pages you have edited are marked in the list, the gallery and the table.
- A PDF export refused to write, saying the OCR layer is incomplete → the pages it names have OCR text that could not be placed. Re-run OCR on them, or export without the text layer.
- Camera lens distortion → calibrate the camera.
- OCR text is poor → check the language and engine in the OCR panel (ocr.md) — but first, check the DPI.